CMS Version 8 User Guide
Recommended File Formats
Image file formats recommended for use on the NSU website are .jpg, .gif, or .png. These file formats can be created and/or edited in any standard image editing software such as Photoshop or other free online image editing tools.
.jpg Format
.jpg (Joint Photographic Experts Group - JPEG) is the best choice for displaying photographs on the Web. The recommended .jpg image resolution is 72 pixels/inch or 96 pixels/inch.
.gif Format
.gif (Graphic Interchange Format) are used for images that contain a simple color palette with text, line drawings, charts, or when animation is needed. Recommended .gif image resolution should be either 72 pixels/inch or 96 pixels/inch.
.png Format
.png (Portable Network Graphics) is a common file format used for compressing images that require transparency. .png files should be used sparingly and should not be used as a replacement to .jpg for standard photographs.
Display Size, File Size, and Optimization
Display and File Size
Image display size will vary depending on the page type you are using. Since pages have many options to display images, we recommend that you attempt to limit the overall amount to deliver a more positive visitor experience.
University/College home pages contain 4 different image size areas listed below. All sizes below are listed as width x height in pixels.
-
Banner Images:
-
Display Size: 1138 x 403
-
File Size: 75 kilobytes or less
-
-
News Images:
-
Display Size: 249 x 155
-
File Size: 20 kilobytes or less
-
-
Ad Images (lower right side):
-
Display Size: 350 x 125
-
File Size: 25 kilobytes or less
-
-
Spotlight (lower left/middle):
-
Display Size: 350 x 230
-
File Size: 25 kilobytes or less
-
University interior pages contain banner image(s), optional page content images, right and left features, page sliders, and faculty/staff images. All sizes below are listed as width x height in pixels.
-
Banner Images:
-
Display Size: 848 x 351
-
File Size: 65 kilobytes or less
-
-
Page Content:
-
Display Size: 200 to 250 width
-
File Size: 25 kilobytes or less
-
-
Right/Left Features (blocks):
-
Display Size: 200 width
-
File Size: 20 kilobytes or less
-
-
Page Slider:
-
Display Size: 259 x 148
-
File Size: 20 kilobytes or less
-
-
Faculty/Staff:
-
Display Size: 200 width
-
File Size: 25 kilobytes or less
-
File Optimization
To help provide the most optimal speed for your site visitors, we recommend that all files be optimized prior to uploading to CMS and use on your website pages. This should be completed after all image modifications.
Utilize the following online tools to reduce your file sizes:
- .jpg Files - TinyJPG
- .gif Files - Compressor IO
- .png Files - TinyPNG
Image Editing Software
For basic image resizing and resolution quality, Microsoft Paint or free online tools (Pixlr or GIMP) are recommended.
If more advanced image editing is needed, Photoshop software may need to be purchased by your department. If you have access to Photoshop, you may download the College Home Page banner template.
Although basic editing tools are available in the CMS (resize, crop, flip, or rotate), images should always be formatted to their recommended resolution, display size, and optimized prior to uploading to the CMS for use on your website.
Banner Image Best Practices and Guidelines
- Always use correct banner image size listed above. Using the wrong banner size may cause distortion.
- Do not skew or stretch font and/or images - keep original aspect ratio.
- Use original photography whenever possible.
- Use stock photography sparingly and only if original photography is not available.
- Images must be modern and of professional quality.
Carousel Banner Guidelines
- High Resolution images work best (anything over 1920 pixels by 1080 pixels).
- Carousel sliders should feature no more than 7 scrolling images.
- Do not include NSU logo lock-ups as part of the banner art.
- Other logos/marks should be used sparingly. Third-party logos must be approved by the third party for web use.
- When using font overlays, ensure copy is legible against the selected image; if needed, use subtle techniques such as drop shadow or a translucent background behind text. Sometimes just adjusting the position of the background photo is enough.
- Use Open Sans font. This is a free font that can be downloaded here.
- Text overlays should be concise to aid readability on smaller screens.
- Main Heading should be a 2 to 6 word title displayed in Title Case.
- Subheading should be up to a 12 word description or event date to be displayed in Sentence case, as a single line of text, and vertically centered within a colored bar.
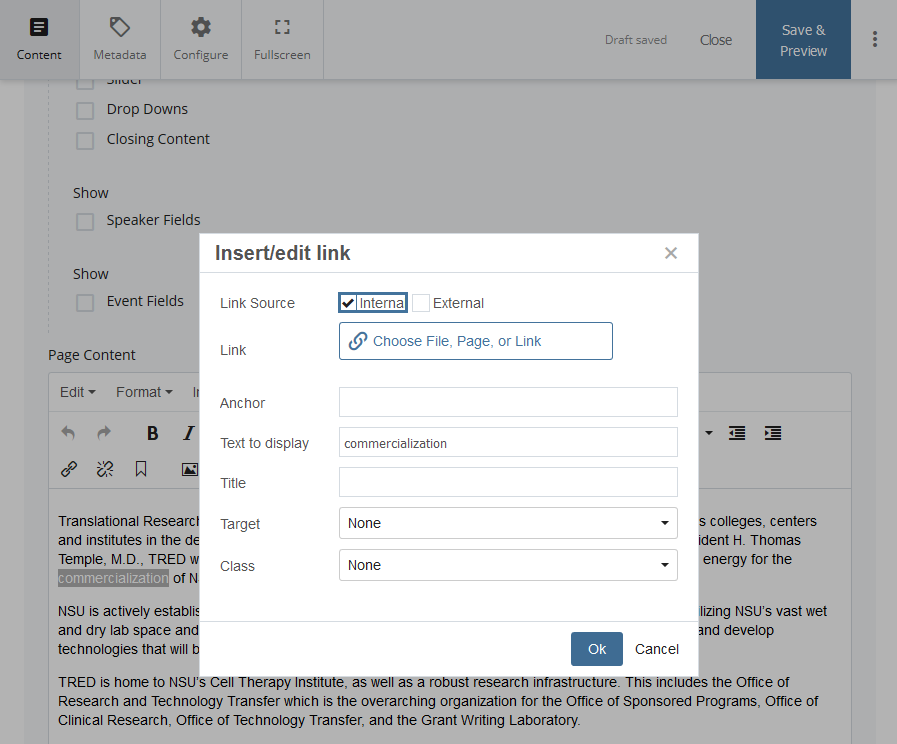
Internal Linking
When adding links on your Web pages to other pages and/or documents (images, Word, PDF, etc.) in the CMS, make sure that they are created as an internal link, as this is the best practice when building your site.
When content is received from others and you are charged with updating the Web pages on your site, make sure to change any existing links within the content you received to an Internal Link. Internal linking will greatly reduced any possible broken links because the CMS will auto-correct them if an asset is moved/renamed in the system.
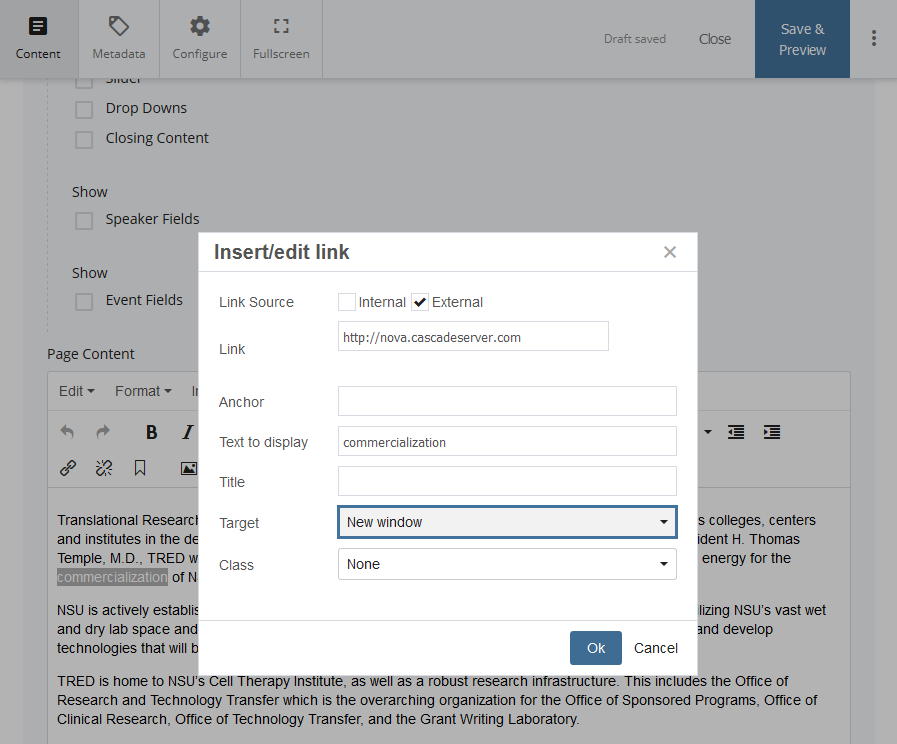
External Linking
If an external link is needed, ask yourself first if the link you are adding may be re-used again on other Web pages within your site or possibly others.
If so, instead of using the direct external link option on your Web page, create a system external link (symlink). See "System External Link (Symlink)" section below for further details.
If it is a one-time use of the link on your Website, go ahead and use the external link option and add it directly to your Web page.
Please remember to set your external link "Target" property to open the link in a "New Window." This will ensure that users of our site will not lose the NSU Web page that they are currently viewing. When the link is clicked, another tab or full browser window will open for them to view the external resource you provided.
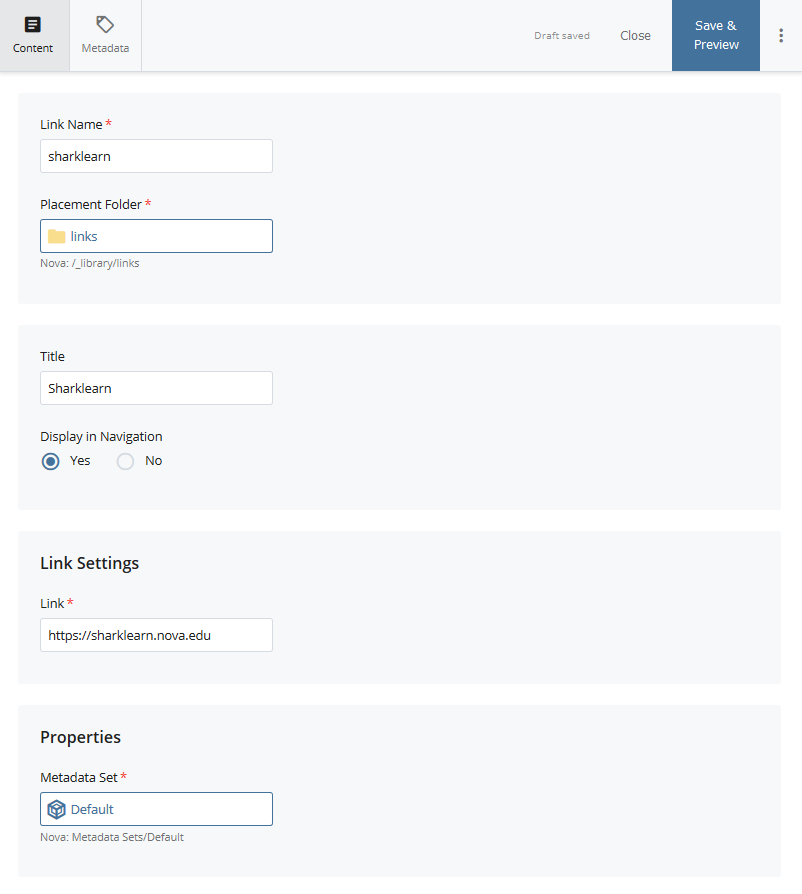
System External Linking (SYMLINK)
System External Links or Symlinks are very useful when you are linking to the same resource several times within your Web pages or when you have determined that other NSU Websites will be utilizing the same external link.
System External Links can be created in the CMS by clicking on the "Add Content" link and choosing the "External Link" asset. You will be able to save a System External Link under the "_library/links" folder area (either top level or a sub-folder you created or that was provided to you).
System External Link will save you lots of time, instead of having to locate each Web page that you added the external link to and then editing the link in each page, you will just need to visit the one System External Link that you created and then update that one link. Every Web page that is using the System External Link will automatically update to the new link location.
Remember to check the relationships on the System External Link so that you can publish the Web pages that use the System External Link.
Creating New Assets
When creating new assets (pages, files, folders, etc.), be mindful of the organization of your existing site and where you are going to place these new assets.
Ask yourself, does the new Web page, file, folder, etc. you are creating pertain to an already existing section/subject of your site? If so, you should keep this information together in the same location.
For instance, if Web page A is stored under an existing folder called, "graduate" and Web page B is also graduate information, then Web page B should be created under the same "graduate" folder.
Grouping like information should help you keep your site organized and easy to maintain. Remember, you may have an entire group helping you maintain the site and having the content organized logically and using the same standard naming conventions below will help everyone easily find and update the site's content.
Naming of Assets
All asset (pages, files, images, folders, etc.) names should be lowercase and not contain spaces or other non-friendly Web characters such as ().,/':;+=@!#$%?<> when created in the CMS.
To help with making asset names friendly, use a dash (-) or underscore (_) to separate out your asset name. For example: "naming-of-assets".
-
When naming files (.jpg, .png, .docx, .pdf, etc.), make sure that you retain the extension on the end of these files when creating them. If the extension is not present upon creation in the system, you will most likely have issues with this file rendering on your Website and in the CMS.
-
When creating new Web pages in the CMS off of your "New" menu page asset, the Display Name will be used as the asset's name. You may use a mix of uppercase, lowercase, and spaces to initially create the Web page asset. This is due to a special plug-in that will change all uppercase and spaces to lowercase and dashes. For example, my display name would be "Naming of Assets". After the Web page has been submitted or sent through workflow, the name of the Web page would be, "naming-of-assets".
-
When creating folders in the CMS off of the "New" menu asset called, "Section Folder," the Title field will be used as the asset's name. You may use a mix of uppercase, lowercase, and spaces to initially create the folder. This is due to the same special plug-in that will change all uppercase and spaces to lowercase and dashes. See Web pages explanation for example.
Where to Store Your Assets
-
Image Files - Image files (.jpg, .gif, .png) should be stored in a folder called, "images". The "images" folders can be created throughout your Website structure as either top-level or sub-folder level folders.
-
Document Files - Document files (.docx, .pdf, .pptx, etc.) should be stored in a folder called, "forms". The "forms" folders can be created throughout your Website structure as either top-level or sub-folder level folders.
-
Media Files (.mp4, H264) should not be uploaded to the CMS. Instead, these media files should be stored in SharkMedia. You can utilize the SharkMedia embed or link code to add the media to your Web page.
-
Folders* (Section Folder) can be created throughout your Website structure to help you organize like information.
-
Blocks - Content, Page Media, Banner, and most other blocks (except navigation) should be store under the /_library/blocks folder or a sub-folder of this folder.
-
System External Links (Symlinks) - System External Links (Symlinks) should be stored under the /_library/links folder or a sub-folder of this folder.
-
Web pages - can be created throughout your Website structure with like information except in "images" or the "/_library" folders.
* When creating a folder to store like Web pages, make sure to create a Web page with the name "index". This will make a more friendly Web address (URL) and easier to use for marketing purposes. example: https://www.nova.edu/oiit using the "index" naming convention vs. https://www.nova.edu/oiit/my-homepage.html that was named "My Homepage".
For any questions on web site updates, please submit a 'Web Content' request through the OIIT Project Intake and Support.